Installation & Beginner's Guide
Revised & Expanded: Jul 2009
This guide was made to show you how to install and run an updated version of the Amazon Products Feed script (or script for using 'Amazon Web Services' as it is currently named by Amazon) that was originally developed by 'Mr. Rat'. This popular and widely-used script is very easy for novices or professionals to implement and you have total control over the look and feel of the results, so that you may integrate it into your website fairly easily.
The script was modified in 2009 by Chris Lander of Luton (UK) so that it complies with the new 'Key' requirements of Amazon's Web Services.
This guide assumes that you have a basic understanding of HTML. If not, you can find a great HTML guide here
To earn money from your new Amazon Store, you must have at least one 'Associate ID' from Amazon.com for at least one "locale"
(i.e.- "US", "UK", etc.).
Click here to apply if you do not already have one.
As of 15 August 2009, you also must have a valid 'Access Key ID', and a 'Secret Access Key' that are supplied free-of-charge by Amazon.
After you are approved as an Amazon Associate, get these new keys and the derived certificate from the Amazon AWS site. Be sure to print out the page containing these keys for later use when setting up the script's configuration file.
For those of you converting a previous installation to using the new 'Amazon Web Services' script, there is good news. Your existing script templates will run unchanged -- after you import the new scripts to your server and run the configuration steps using your new keys and these directions!
You can install and use the script without these required Amazon ID items if you just want to try the system and to see if this script is right for you. However, until you get those new keys and update the configuration file appropriately, you will not earn any revenue from sales made using the script since they will be credited to the keys currently used in the script.
Whether you are installing the script for the first time, or just installing the new version that is needed to operate after 15 August 2009, please follow the directions in this document. You also should check the Amazon Products Feed Support Forum for help.
For other scripts by MrRat, click here.
The overall installation and set-up process is as follows:
- Get the Script
- Unpack the Compressed Script
- Edit the Script if Needed
- Upload Your New Script to Your Server
- FTP
- CHMOD
- Configure the Script
- Test the Script
This script is so configurable it can get very confusing to someone viewing the complex details for the first time. Just remember that all of these details are only a manner of expressing (in the scripting language) how the script will handle all of the available options. Unless you are an expert, it is not necessary (or desirable) to ever change the script itself. If you decide to attempt to change it -- take it slowly, change one thing at a time, and study the examples. If all else fails check out the Support Forum .
The key to the use and power of this script is its "templates" -- the method used by the script to specify how the information retrieved from Amazon's Web Services will be displayed to a web visitor. These are simple HTML files that are easy to change and you are encouraged to define your own so that the script displays Amazon's data in a manner that is unique to your website. Moreover, you can have multiple sets of templates on your website with each set being stored in a different sub-directory of the "templates" directory. Thus, without ever changing the script itself, any website owner can use Amazon's AWS to retrieve user-specified data in realtime from Amazon's website and to display this data in a unique webpage format designed by the website owner.
In brief, there are primarily three different types of templates that are used by most websites using this script, and each template sub-directory must contain one of each type with the pre-defined names of "page.template", "product.template", and "item.template". The script knows which set of templates that you desire to use by your inclusion of the phrase "...templates=xxx" in the call, where "xxx" is the name of the desired template sub-directory.
The first of these HTML-format files is the 'page.template ' and it contains information about the format that will be used by a website visitor's browser to display a webpage of information. When a call is made to the Amazon Web Services (with proper authentication) AWS will instantly return detailed data for up to ten items that meet the criteria defined in the calling argument. In this template you may include your own logo, headlines, webpage text, images, end-of-page links to other pages on your website, etc, etc. Each page template must include one "%%products_html%%" variable so that there is a link to the "product" template.
The second important template is the 'product.template ' It contains information about the details that should be displayed within the webpage for each product, and the format and sequence in which to display them. This template ensures that the overall webpage will have a consistent display for each of the up to ten items being shown on the visitor's webpage.
The third primary type is the 'item.template. ' It specifies how a separate single webpage that can be requested will display very detailed information about just one specific item -- details such as a detailed item description, enlarged image, product reviews, etc. And, it typically includes the "ordering" button that allows a visitor to your website to actually commit to purchasing an item in a manner in which you earn a "referral fee". When done shopping, your website's visitor then uses it to link to the Checkout (via Amazon's website) and to finalize their order. Once the customer finalizes an order with a valid method of payment, the items ordered by a Customer will appear on your Amazon Associates webpage. [Note that for security purposes, Amazon does not disclose Customer information even to its Associates.]
See the FAQ for more information about templates and the script.
To get the script click here and Save it to your local computer.
As long as you have a program installed that understands compressed archives, like ZipGenius or WinZip , you can double click the file you just downloaded and unzip it to a new directory on your computer, for example named 'aws' [for A mazon W eb S ervices] keeping the subdirectory info intact.
We strongly suggest that you use a new directory for this purpose -- at least initially -- so that you don't mess up any existing activities on your current website until you are satisfied that everything is working properly.
There is one thing that you might need to change in order for the script to run correctly for you.
To edit the script, open it in a simple text editor such as 'NotePad', or any other one that understands Unix type line endings. HTML-Kit works great for this and is what I use to write the script. It looks a bit more complicated, but has some features that make it much easier to edit scripts like this (such as color coding elements). Now that you have it open don't be scared, you only have to change one thing.
The very top line should look like this:
#!/usr/bin/perl
This tells the script where to look for your Perl directory. This is the most common location of Perl for most servers, you should be able to find this out from your hosting. If yours is different, simply edit it in the script. Like this:
#!/usr/local/bin/perl
Only change this if it is different for your server, if it is the same, leave it like it is. This is the easiest way to break the script so if you don't need to edit it, DON'T.
Upload Your New Script to Your Server
To be able to upload your new script to a new sub-directory on your server you need an FTP utility. If you don't have one, you can download WS_FTP_Home (the new freeware successor to WS_FTP LE) , and it has all the features that you will need. I'll refer this program for examples. All of this is possible with any FTP utility.
We strongly suggest that you use a new sub-directory for this purpose -- at least initially -- so that you don't mess up any existing activities on your current website until you are satisfied that everything is working properly. The logical place is to create a new sub-directory named 'aws' under your 'cgi-bin' folder.
Connect to your website in the FTP Program and double click on your cgi-bin folder (you may need to open the public_html folder first, depends on server).
On the bottom of the 2 windows you will see 3 options
ASCII Binary Auto
Make sure that you select the ASCII option or the Amazon Products Feed will not work.
Next, navigate through your computer files and find where you saved the folder you unpacked a minute ago. It could be named anything, but we suggestted that you used 'aws'.
Next create a new 'aws' folder on the server and upload the entire contents of your local computer's 'aws' folder to the newly created 'aws' folder on your server. You do this by clicking on the folder name shown in the Left Window, then click the right arrow in between the two windows. 'WS_FTP Home' will ask "Do you want to transfer selected folders and their contents?" click 'Yes'.
Now that you have the script installed on your server, you need to change a couple of settings.
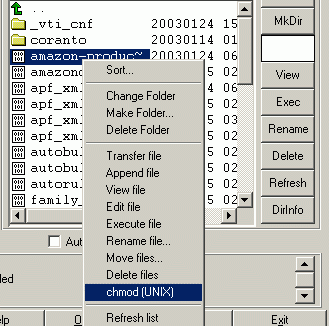
After you have the files saved to your server you need to CHMOD three of them. What this means is that you will tell the server who's allowed to access this script and what they can do with it. To do this, simply right click on the file name 'apf4.cgi' on the server side and near the bottom you will see an option "chmod (UNIX)" -- or 'Properties' on some other FTP programs.

Select this, and another box will pop-up with check-boxes.
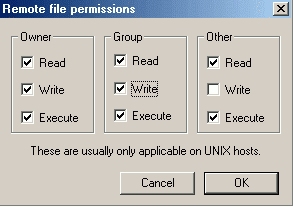
This is how you determine the CHMOD setting. The top row that says "Read" is counted as 4, the second row that says "Write" is counted as 2, and the last row that says "Execute" is counted as 1. The example below is what you need yours to look like, this is a setting of "775".
 CHMOD "775"
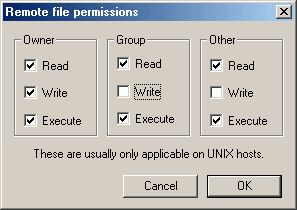
If you run into any problems try the setting below which is "755" , some hosting companies will only allow you to run one or the other, but one of them should work for you.
 CHMOD "755"
Do the same thing for both the 'apf4_test.cgi' and 'apf_config.cgi' files and then you'll be ready to configure the script
After you have your script installed and CHMOD'd, you're ready to configure it. Open your browser and go to:
http://www.YOUR-SERVER.COM/cgi-bin/aws/apf_config.cgi
DO THIS NOW. The first person to run the config script gets to pick the password and you really want it to be you that picks the password. The config script should be pretty self explanatory. Just be sure to change the Associate ID to your Amazon-furnished IDs for each 'locale' that you use, to enter your new Amazon-furnished 'Access Key ID' and your new Amazon-furnished 'Secret Access Key', and be sure to change the 'locale' to your 'locale' (usually to 'us'). When in doubt, do NOT change any of the other field values.
Then enter your new 'Password' and 'Save' the configuration settings.
Now you're ready to see how it works. Open your browser and go to:
http://www.YOUR-SERVER.COM/cgi-bin/aws/apf4_test.cgi
Note: the 'apf4_test.cgi' file is identical to the 'apf4.cgi' file except that the file's name ends with the characters "_test.cgi". This separate testing script file was included purposely so that when you do testing with it you will see debugging messages returned from the Amazon server showing that it is correctly accepting your buried new Amazon 'Access Key ID' and your new Amazon 'Secret Access Key'
If everything is working properly, you should see successful debugging messages, and you should be able to navigate through the categories and see some of the products. If you have any problems, specifically Internal Server Error (500 Error):
- Try changing the CHMOD settings from "775" to "755"
- Re-upload the script to your server and make sure you check the ASCII box, and CHMOD it again.
Assuming you have been successful, you are now ready to test YOUR current scripts if you have previously used an earlier version of these scripts. To do so, it is necessary to use your FTP program to copy the entire contents of your previous ".../templates" sub-directory into the new '...aws/templates' sub-directory on your server. Also, replace the ' page', 'product' and 'item' template pages in your '...aws/templates/default' sub-directory with the pages from your previous '.../templates/default' directory.
Now you should be able to go to:
http://www.YOUR-SERVER.COM/cgi-bin/aws/apf4_test.cgi and you should see your default templates, along with the initial debugging messages.
And finally, check that things work without the debugging messages by going to:
http://www.YOUR-SERVER.COM/cgi-bin/aws/apf4.cgi and everything should work as before, but without the debugging messages.
If this all works, you have been successful in setting up the scripts and can go "live". The preferred solution is that you now revise all of your existing webpages so that they now call:
http://www.YOUR-SERVER.COM/cgi-bin/aws/apf4.cgi
Note: It is possible to just use your FTP program to copy the entire contents of the new '.../aws' directory into your old '...apf' directory (or whatever it was previously called), but you also will have to rename the 'apf4.cgi' file to be called 'amazon_products_feed.cgi' (or whatever you called the primary script before). Be extremely careful trying this however, since you will destroy your previously-working scripts and templates and if you forget your old script or template names, etc. and don't have backups, you would be without any way of recovering.
These are the most common problems, if you are still having problems consult the Support Forum. Use the search feature, since most of the problems have been discussed there and your questions will probably have already been answered. Feel free to post a question if it's still not resolved.
Still with me, great! As soon as you're ready to customize the look and feel of the script templates, read our
Amazon Products Feed - Advanced GuideRevised & Expanded: 21 July 2009 by hgv (Henry Vaughan)


